When I finished that, I was feeling mighty chuffed...so of course I looked around to see what else I could sew. My eyes immediately fell upon my old, crusty, oft-used and rarely-washed oven mitts! I remembered my mother sewing new covers for her old ones, to match the kitchen decor...dusty blue, or reds and yellows...it seemed like my mom was always re-imagining her kitchen and I have fond memories of giving the old wainscotting a fresh coat of white oil paint in the summertimes of my teenage years.
This is the second set I made, to match my runner...I couldn't help myself!
So, here's how it's done. If your old oven mitt is a padded object inside a fabric mitt, pull this out. OR you can just trace the whole thing (the pair above was the quilted-padding kind). Place the old fabric "outer" on a double layer of your chosen fabric (right sides together!) and trace it, giving it a generous allowance (an inch would be lots). Remember to leave some fabric at the bottom to allow for a hem.

Sew a 1/4" seam around the whole thing, then hem the bottom (just turn it up about a 1/4", then again, and sew around). Before you turn it right-side out, you'll need to make a few snips at curvy parts, like around the top, and around the thumb (be careful not to snip through your stitching!) This prevents the fabric from bunching and buckling when you have it right-side out.

Also make some snips in that "joint" between thumb and fingers:

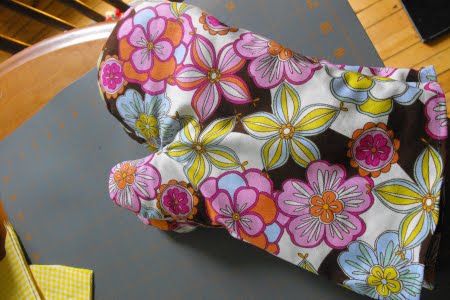
Turn it right-side out, insert the old pad, and Bob's your uncle! I am in love with my new oven mitts...they're so fresh and clean and cheery. And they're gingham...how good can it get?

Can you fit in 15 minutes today to perk up your oven mitts?
I am so doing this. You would not believe the nastiness that is my oven mitts!
ReplyDeleteStephanie:)
www.simplicitymom.blogspot.com
I really like this idea. My oven mitts are pretty gross looking, they could definitely use a pick-me-up.
ReplyDeleteYour oven mitts are lovely and your header photo on your blog is amazing:)
ReplyDeleteTake care
Linda
Oooooh, pretty revamped oven mitts with which to remove my freshly baked pie from the oven!! It is so fun to freshen things up. Your new oven mitts are wonderful and so happy looking!
ReplyDeleteMy oven mitts are super-thick loopy cotton cloth so I am able to wash them in the machine. They take forever to dry but it's worth washing them now and then.
ReplyDeleteYour tutorials are making want to get a sewing machine..(don't tell Mom!)
That is cool! I revamped the kiddy seat cover and wind screen for the bike this way! My mittens are still nice enough, but there are a few outdoor seat covers in need of sprucing up... That will take a bit longer than 15 mins though ;)
ReplyDeleteCan you make covera for mine?
ReplyDeleteYou craft/sewing challenged sister
Now, there's a project I'll do as soon as garden season is over. What fun to fix up something old and grubby into something bright and new. Thanks for sharing the idea.
ReplyDelete