Pages

Showing posts with label fabric. Show all posts

Sunday, December 5, 2010

The Moodie Flip Doll: A Tutorial (Kinda)

My sweet niece turned 7 today! She is unique in many ways, and therefore it is often a challenge to find a gift for her. I just couldn't settle on anything, either store-bought or handmade, until this morning...4 hours before we hit the road for her birthday party!

Meredith's nickname is "Moodie"; I'm not sure where it originated, but it's what we all call her. When I woke up, it came to me that I had to create a Moodie Doll for her.

I started out with a pattern for Emily Martin's Black Apple Doll, times two, and minus the legs (complex mathematics)! I freehanded the faces, one happy and one sad. For the eyes, I used satin stitch, then small back-stitches around the iris.
Close-up of satin stitch (basically, filling in an area with long stitches)

Tiny backstitches  define the filled-in area and tidy up the edges.

The completed faces, with hair laid on!

I used backstitch for the eyebrows, lips, and around the eyes as well. Follow Emily's instructions for sewing the hair onto the face, then the head, arms and bodies. At this point, I had two Black Apple Dolls with no legs.

She is very sad, wondering where her legs went.
For the skirt, I cut a length of fabric about three times the width of the doll's body, and long enough to cover the doll from head to waist. Choose a print that doesn't have a "wrong" side. I ironed up a hem, and sewed some rickrack onto the turned-up side to cover the hem.

I sewed a seam to connect the two short ends of this rectangle, creating a tube. I did my own version of a French seam along this side seam to make it look finished on both sides. I then added a loose gathering stitch along the top of the skirt, and gathered it until it fit onto the doll's waist.

I sewed this onto the "happy" doll, the way you would a skirt to a top (right sides together). This is how it looked at this point, with the doll's body stuffed:

I then took the "sad" doll, and ironed a hem up into her waist. I stuffed this half of the doll, flipped the other half upside down, and hand-stitched the sad half onto the happy half. This covered the rough edge where the skirt joined the upper half.

Please be reminded that I called this a "Tutorial (Kinda)"...I was making this up as I went along, with a clingy child leaning on my arm as I worked. Email me if you seriously want to attempt to follow my half-assed instructions and still have questions (I can't imagine how you would...!)...I call this kind of rudderless creating "organic"...it evolves as I work, and I just trust that as problems arise, I'll deal with them. I do like the fail-proofness of following a formula, recipe, or pattern. But honestly, this project gave me so much satisfaction, to bring a seed of a plan into fruition! What have you got to lose, besides time and a bit of fabric?
 
Here is what she looks like in mid-flip.

I made the sad doll's torso a bit too long. I also sewed her hands together in front (as if clasped in shame!) because they were causing the skirt to stick out too much when flipped.

Curiosity got the better of Miss Violet and she had to check out what was going on under that skirt!

While I did learn to sew from patterns, "winging it" is much more my style. I love how this doll turned out, and love how her name is so fitting for our sweet Moodie. She fit perfectly inside one of those skinny wine-bottle gift bags which made me giggle. Let me know what you think, and if I ever make another I'll take more pictures to give clearer instructions! For now, just go for it...winging it just might bring a little thrill to your life.

Thursday, December 2, 2010

Little Quilts

While the Handmade Holidays movement is appealing to me in terms of resisting consumerism, teaching my children the "real" meaning of Christmas, and showing off my crafty self, I'll admit that this year I'm handcrafting my children's gifts because I'm flat broke. There is really nothing left at the end of the month, with mortgage and childcare payments, and part-time pay. Often there's nothing left in the middle of the month, either. Things are about as bad, financially, as they've ever been. It's time to put snow-tires on the van but there's no money for that. Each month we wonder if we can hang on a bit longer (till I go back to full-time work) or if we should think about selling the homestead.

I don't think I would be alone in acknowledging the fact that choosing to live simply is based in large part on our income. It would be much easier to just go out and buy gifts, pyjamas, etc. for my kids for Christmas. And I know that a day might come where the little handmades I offer don't seem like "enough". But my mom mentioned the other day how lucky I am that my kids don't watch TV the way we did when we were kids. They really have no idea what's out there in terms of toys. When I asked them what they'd like Santa to bring, they were kind of stumped. So, anything new-to-them that's wrapped and under the tree will bring as big a thrill as some shinily-packaged, plastic-wrapped, store-bought gift.
I'm trying to kick the Facebook habit that has begun to absorb much of my "spare" time. Last night, instead of sitting there like a crackhead, chatting with friends and looking at other people's photos, I sat at the kitchen table and sewed these two quilt tops. We plan to repaint a small bunkbed, crib, and rocking chair for the girls, and present them with a little doll nursery, complete with colourful little quilts. The nine-patch is one of the easiest of quilt patterns: just cut out five squares of one colour, and four of another, and sew them together to create a checkerboard. Lots of these blocks will use up your scrap stash, and could turn into a quilt of any size you wish!

You can find a tutorial for log-cabin blocks here.

Every year I plan to send Christmas cards. "Plan" is the operative word, here. As a schoolteacher, December is particularly busy for me: with the normal decorating/baking/gift-making/etc. that goes into preparing my home, I also create gifts for my students, plan and rehearse our Christmas concert performance, transform the dramatic play centre into a Toy Shop, and so on. But with my rediscovered, Facebook-free time last night, I stitched this little patch, which I will glue onto cardstock. To keep things within reason, I've decided to send cards only to friends and family I see/talk to regularly, instead of to everyone in my address book. I know the ease with which I get overwhelmed. I love the word "peace"...and dream of really feeling it in my heart this holiday season.

Sunday, November 7, 2010

Handmade Holidays...Tiny Stockings!

For the past 4 years, four friends and I have created sweet handmades to exchange. We each make 5 of 5 items, then gather for an afternoon of tea and sharing. We all end up with 25 unique, beautiful handmades which we wrap individually in tissue paper, attach to a large tree branch, and present to our children on the First of December. Each day until Christmas, they open a lovingly-handmade gift and anticipate the big day!

We often feel so busy as the holidays approach, and sometimes we all think...oh, do we have the time or energy for this? This is where flexibility comes in handy (e.g. three handmades, two store-boughts!)...I find as I start to create my contributions, I just get excited and the energy flows in.

Today I began work on these little stockings. They're delightful! I found the pattern in "Better Homes and Gardens' Holiday Craft" magazine, which you should be able to find at your grocery store. It's full of wonderful little handmades and ideas for gifts you can craft for your loved ones.

100% wool felt, including some plant-dyed pieces add to the rustic feel of these little stockings.

Tiny stitching and beads add to the Jan Brett appeal!

I'm thinking of mounting each of these little stockings on a piece of white felt, and adding hanging-loops...we'll see where inspiration carries me. If you're the crafty type, how are your handmades coming along? Advent Sticks could be quickly and easily assembled with small store-bought items if you're NOT the crafty  type. Gather your other non-crafty friends and each of you bring 5 of 5 little gifts to share. Be flexible and have fun! Be sure to visit Tonya over at Plain and Joyful Living for more Handmade Holidays ideas!

Thursday, November 4, 2010

Craft Classes: Felt Crowns

Last evening Maureen (of Twig and Toadstool) and I hosted the second installment of our series of craft workshops, aimed at mamas who want to create beautiful handmade gifts for their children. You can read about the first session here, where we made felt fruits and veggies for our little ones. Both Maureen and I are thrilled to pass on our skills and knowledge, not to mention the perfect excuse it gives us to drop everything and hang out together! As two part-time workers, and full-time mamas, it can be hard to find time to just visit and craft. To do it in the company of other enthusiastic wild women makes it all the more fun!  

Who could resist this rainbow of embroidery floss,

these colourful scraps,

a jumble of pins, needles, and scissors (recognise that toadstool pin-cushion?),

and an opportunity to create a gift of beauty and love?

Patient hands learned blanket stitch, running stitch, and backstitch,

and personalised and embellished with silk flowers, rickrack, ribbon, and buttons.
In spite of the uproarious mama-and-grandma-laughter, this little man dozed off (felt food in hand!)

allowing his mama to stitch this beautiful "L" onto his crown!

A sampling of the almost-finished results! (We used Amanda Blake Soule's crown template, found in her book, "Creative Family").

During these craft-lesson gatherings, the best moment for me is seeing the sparkle of pride dawn on a mama's face when she finally figures out how to make a nice, neat blanket stitch, or finds her finished product looking so much lovelier than she'd imagined it would. Crafty possibilities blossom, and everyone leaves with a feeling of accomplishment and renewed confidence!

Do consider sharing your skills and gifts with the world, either through informal gatherings like this one, where you collectively create an opportunity to create by bringing a bunch of materials (beads, earring hooks, string, feathers, mirrors, paper embellishments, etc.), or through classes. We've been so thrilled with the response to our Handmade Christmas series that we're already planning our Spring sessions!

Visit http://www.twigandtoadstool.blogspot.com/ for details of upcoming classes!


Monday, July 12, 2010

Home Sewing Part 2: Revamping Old Oven Mitts!

In last week's home sewing post, I showed you how to create a simple log-cabin table runner. You can make one even if you don't live in a log cabin, as this refers to the style of the quilt block...I'm sure it would perk up apartments, farmhouses, yurts, and igloos just as much as a log cabin!

When I finished that, I was feeling mighty chuffed...so of course I looked around to see what else I could sew. My eyes immediately fell upon my old, crusty, oft-used and rarely-washed oven mitts! I remembered my mother sewing new covers for her old ones, to match the kitchen decor...dusty blue, or reds and yellows...it seemed like my mom was always re-imagining her kitchen and I have fond memories of giving the old wainscotting a fresh coat of white oil paint in the summertimes of my teenage years.

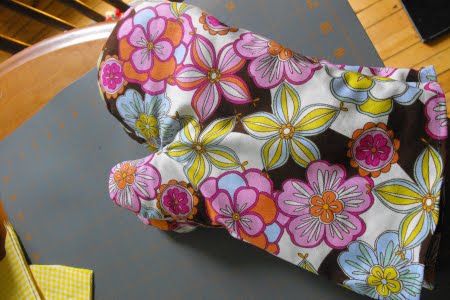
This is the second set I made, to match my runner...I couldn't help myself!

So, here's how it's done. If your old oven mitt is a padded object inside a fabric mitt, pull this out. OR you can just trace the whole thing (the pair above was the quilted-padding kind). Place the old fabric "outer" on a double layer of your chosen fabric (right sides together!) and trace it, giving it a generous allowance (an inch would be lots). Remember to leave some fabric at the bottom to allow for a hem.

Sew a 1/4" seam around the whole thing, then hem the bottom (just turn it up about a 1/4", then again, and sew around). Before you turn it right-side out, you'll need to make a few snips at curvy parts, like around the top, and around the thumb (be careful not to snip through your stitching!) This prevents the fabric from bunching and buckling when you have it right-side out.

Also make some snips in that "joint" between thumb and fingers:

Turn it right-side out, insert the old pad, and Bob's your uncle! I am in love with my new oven mitts...they're so fresh and clean and cheery. And they're gingham...how good can it get?

Can you fit in 15 minutes today to perk up your oven mitts?