Pages

Showing posts with label sewing. Show all posts

Sunday, January 15, 2012

Thrifty: Repairing My Favourite Sweater

My favourite sweater was purchased in August 1997, just before I headed up North to teach for a year. I was twenty-three years old, and just embarking on my teaching career. I loved this sweater. Blue, rust, chocolate brown, gold, all in a classic pattern. Plus, it was a cardigan. I wore it with jeans, I wore it with dresses, I wore it with skirts, I wore it with nightgowns.

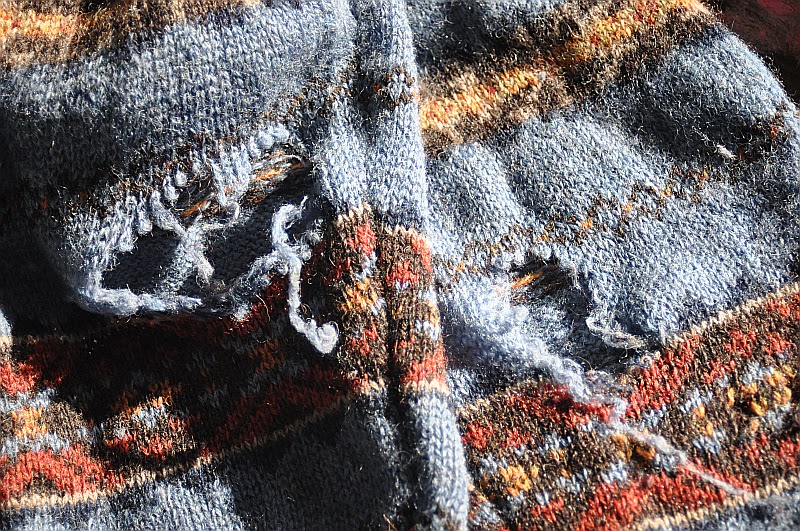
The trouble is, this sweater was 100% wool. Warm, yes. Durable? Not so much. Wool tends to wear through wherever there's any steady rubbing or pressure. So, with time, the elbows gave out. A moth or a mouse nibbled a small hole near a button.


There were times when I thought I'd just felt the thing in the washer and make slippers out of it. But I just couldn't bring myself to do it. It's everything I want in a cardigan: nice fit, not too thick, beautiful colours, classic design. I just couldn't do it.

Today was what we call a "Two Fire Day" (fires in both the wood furnace and the kitchen woodstove); it was that cold. It was the day to fix my sweater.

 First I had to choose a fabric that would be both complimentary and quirky!
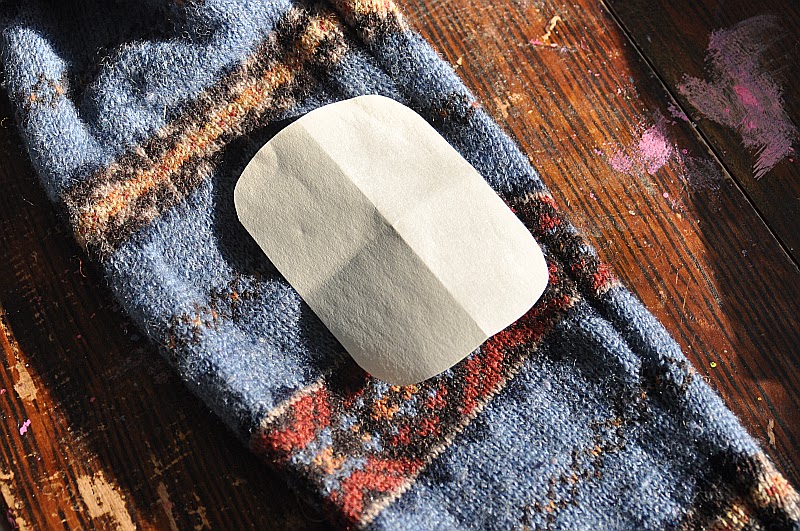
 Next, I created a pattern for a patch large enough to generously cover the holes.
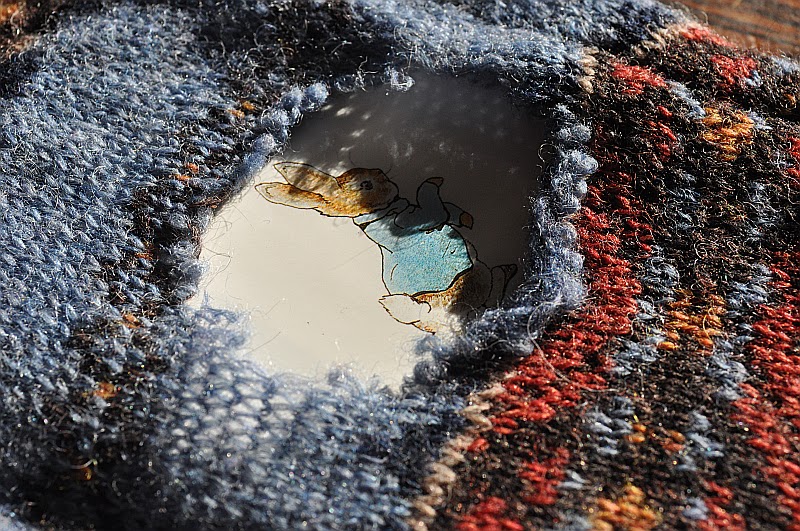
 A small book inserted inside the sleeve offered a good flat surface on which to stitch (and ensured that I don't catch the other side of the sleeve). Peter Rabbit is the perfect size!
 Using an iron, I pressed a rolled hem around the edges of the patch, then used embroidery floss to stitch it onto the elbow of the sweater.
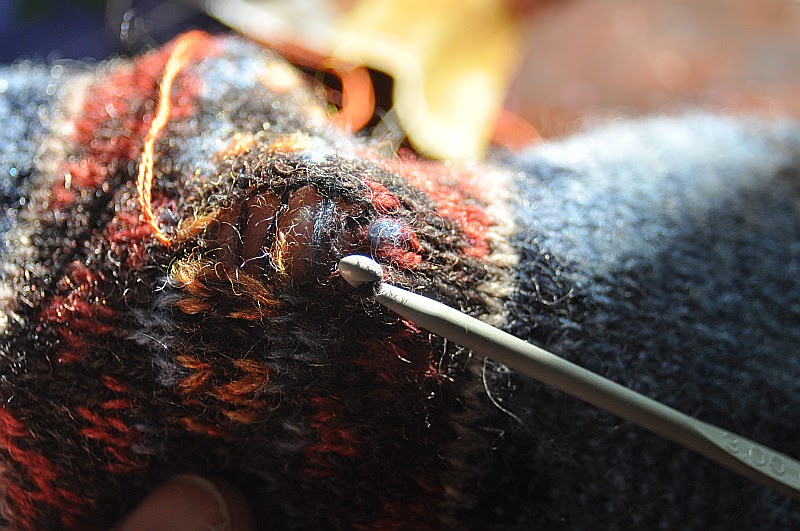
While sewing, I noticed a few stitches that were beginning to "ladder", so used a crochet hook to pick them back up, then secured them with a stitch.
Not so scholarly as leather patches on tweed, this dear sweater of mine feels even more mine with the addition of pretty patches.

The patch over the hole in front wanted to be a heart-shape. Now, instead of looking ragged and worn, this beautiful garment has years of life in it, and will be worn proudly until I wear through the patches.

Tuesday, October 25, 2011

Felt Nesting Dolls

It's that time of year, just before Halloween, when one starts to think about Christmas. At least I do. I imagine most mothers are like me...as the days get shorter, our hands start to itch with wanting to make stuff. Usually, this time of year sees me busily crafting five times five little items to share with other mama friends, to create our beautiful Advent Sticks. This has been a beloved tradition for the past four years.

This year, we collectively decided that we're busy enough with work, housekeeping, the various animals in our care (dogs, cats, chickens, bees, horses, etc.), and our children's extra curriculars (hockey, stepdancing, piano, singing, etc.), and that maybe this year we could...well...ease off a bit.

This led us to decide that we'll each craft five items only, to share with one another at a gathering sometime before Christmas. We'll add in a bottle of wine (or three) to the gathering, and all will be merry!

I had already begun these little felt Russian Nesting Dolls (they don't really nest!), and have decided that these will be my gift to my dear friends in crafting, mothering, and everyday life. Traditionally, these dolls come in all varieties; I've seen nesting angels, and a nesting Farmer in the Dell set.

There's something so sweet and charming about the Peasant Mother style of Matryoshka, though, isn't there? Even the name sounds maternal. Our little circle of mamas is not comprised of blondes in kerchiefs, but the sentiment is the same.

The serene face, the healthy figure, the roses in the cheeks: these are mamas that have found their wisdom and peace in their roles.

They embrace the busyness of their lives, and know when to take a moment to rest.

They also have great fashion sense, and looked so sweet near this red bowl of eggs that I couldn't resist adding it as a prop to this photo shoot!


The pattern came from Better Homes and Garden's Holiday Crafts magazine, which I buy every year at the grocery store. It's well worth the cost; this year's edition contains many lovely felt projects, with wonderful patterns. I have a few others on the go and will share as I complete them.

Tuesday, July 19, 2011

GratiTuesday: Busy


When I started GratiTuesday, it was to create an opportunity for stream-of-consciousness gratitude in the midst of my busy life. I don't always take pictures of what is on my list, because it usually just flows out as I write it. Gratitude isn't something we should PLAN, but something we should just naturally feel in the presence of the many blessings in our lives.

Here's my list, in no particular order...

.: my parents' generosity in helping us purchase a second vehicle (thus saving my sanity), and in the gift of tickets to see the Lion King at the National Arts Centre. It was unforgettable, for my kids and for me, and something I would never have been able to afford.

.: the gift of music, especially since it's something I can share with my husband, with so much joy. We had our first performance together in a long while, at the Bonnechere Caves, sharing the stage with many other local talents. Later, we recorded a video INSIDE the Caves! Amazing! Visiting with friends I haven't seen in ages, listening to the water going over the Fourth Chute of the river, and seeing the almost-full moon rise conspired to create an unforgettable evening.


.: getting together with a dear friend, whose children love my children. One older, reading child plus four smaller, book-loving children equals a beautiful storytime!

.: creating my first "stock"...piles of hats, felt crowns, knitted snails, and small cotton dolls to sell at a arts/crafts show this coming weekend.

.: having captured this moment: my mother fitting Violet for a handmade dress. I can remember standing on a chair in this same kitchen, my mother expertly holding pins in her mouth as she created a hem. The added beauty of this dress is that the darker fabric is from a dress my mother made for ME when I was in Grade Two. She'll be selling dresses like these at the craft show mentioned above!

.: the joy of a really great, can't-put-it-down read: "One Day" by David Nicholls.
.: always, always, the first sip of coffee in the morning
.: Brad Pitt as Tristan in "Legends of the Fall" which I watched last night AGAIN!
.: the cool nights that follow a wicked thunderstorm
.: bellydancing outside at a local farmers' market, settling back into my body, loving the breeze swirling my skirt and the warmth of the grass beneath my feet
.: looking at my husband in the early morning as he sleeps, marvelling that he looks EXACTLY as he did 10 years ago when we met: hands crossed across his chest, so peaceful, and so beautiful.
.: as always: Jude's freckles, Violet's cartoon-character voice, and Margot's fingers holding a paintbrush.

What I'm getting around to saying is that gratitude is not some polished stone that should be taken out and admired once a week. It's something I want to feel sifting into my soul throughout the week, at random moments, especially when I'm worrying about money, or the mess of my house, or how I can get everything done "on time". Because really: there is abundant EVERYTHING in my life right now.

Grab that button and link back to me: what are YOU grateful for this week?
Monday, May 9, 2011

Quick Posie Hat Tutorial

I wish I was one of those mothers who would make a sunhat by hand...then sew busily away until I had enough to sell on etsy. I'm not one of those. My girls needed sunhats, so I bought two of the same hat at our local hat and shoe store. They were cheap, pink, and cotton...that is to say, they were almost perfect.

I didn't like the little tied-in-a-knot bows adorning them, nor did I like the idea of the girls having hats that are EXACTLY the same. So, I personalised them, in about 10 minutes.

Trace a circle onto a piece of cotton of your choice, and cut out.

With needle and thread, do a running stitch (in, out, in, out) all around the outer edge of the circle.

Gently pull the thread to cinch the circle closed...

...and pull tight. Secure with a few stitches.

Remove the ugly bow, then choose a pretty button!

Sew the button to the centre of the flower, passing thread through the hat several times to secure the whole thing.


You might just get carried away and decide to add a whole garden! I am now thinking I may have to do an entire hat band of little posies. Try embellishing a jean jackets, barrettes, a brooch, or a sweater. They can also be stitched together to create a table runner, or if you're really ambitious, a whole quilt!

The bucket hat: an essential piece of summer clothing, personalised and created (almost) entirely by hand!

Sunday, December 19, 2010

Handmade Holidays: Down to the Wire!

Inspired by Amanda's Solstice pyjamas, my friend Maureen and I created these Christmas pjs over two craft sessions. On the first night, we sewed the pants (perhaps a tutorial in the New Year?); the stitch ripper got some exercise, but Maureen diligently learned to put in the waistband elastic!

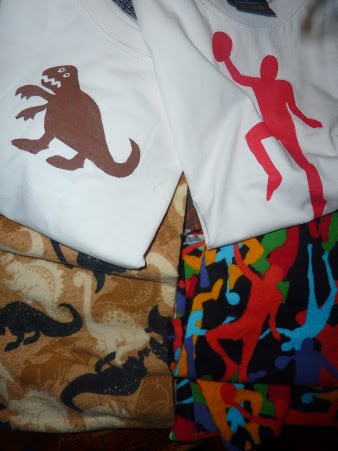
Our second session involved creating matching tops, using plain shirts and fabric paint. I realised after painting the apple on the white shirt below that the seeds are NOT that close to the skin, but I doubt Violet will notice! I'm really pleased with the way Jude's dinosaur turned out!


These slippers were inspired by this post! I'd been hanging on to this whimsical felted wool sweater, unwilling to cut it up until I found the perfect project...turns out this was it! It honestly took about 30 minutes to make this one slipper! I can't give them away, so they're my handmade gift to ME! I just love them: the fit, the colours, the little crocheted cuff...they're just so sweet! They'll definitely be on my New Year's "to make before December 2011" list!
Another lovely idea that is QUICK involves turning vintage women's watches into photo-bracelets. I saw this in a magazine years ago and would give credit if I had the slightest notion what it was. But I don't. The picture of my hubby (on the right) was taken in the first week we met, and the baby niece in the other photo is now twelve, so that should give an idea of how long ago I made these!

10 years ago you could find these old watches relatively cheaply at thrift stores and yard sales. Just remove the back plate, trace it onto a photo, place the photo in and replace the back. Voila! These look so lovely and charming when worn together in a group. The patina and unique details of these vintage pieces of jewellery rival any "fake vintage" stuff out there. Ask your mom or grandma if they have old watches kicking around...


And last, possibly most insanely, but definitely not least:

Quite belatedly, I decided to try my hand at some Waldorf-style dolls for my girls. We're cleaning up some old thrifted furniture (doll bunk beds, cradle, and rocking chair), and I've sewn some doll-sized quilts. Naturally, the only thing missing is a pair of dolls! We have your usual garden-variety craptastic dolls, given to us and picked up at yard sales over the years. None of them is a favourite with my girls, but somehow they continue to multiply. I've decided to get rid of them all! They have no charm, no spirit, no personality!

Using a tutorial I found here, combined with previous doll-making experience, I sat down last night to craft the heads. I'm really quite happy with how they turned out; they look friendly without simpering, sweet without being saccharine. Of course, those little quiffs on top of their heads make them look like Casper the Ghost (as my ever-observant hubby pointed out)...so now the challenge is creating hair. I acquired some beautiful mohair from a friend down the road and crocheted this wig base:

This is the second attempt and my (ever-helpful) hubby said "Achtung!" to both (because he thinks these so-called wigs look like WWII German helmets). Sigh. I'm out of this colour so can't loop longer pieces through this so-called base. Time's a-ticking...but for now, this elf is off to bed. I'll do a whole post about these little dollies if/when they come to fruition. This is looking like a last Handmade Holiday post, for this year anyway.

Thanks to Tonya at Plain and Joyful Living for inspiring and hosting this wonderful blog-share!


Wednesday, December 15, 2010

Scenes from the Homestead

As part of our attempts to keep things a bit simpler this year, I've decorated minimally. I wouldn't say I'm a natural at Christmas decorating; my mother, and my friend Shanti, ARE...they artfully swag their windows with boughs, shelves drip greenery and berries in a seemingly effortless way; there is a perfect balance between natural and glittery decor. I LOVE the way this looks. I try it every year. And am always disappointed with the results. I am good at many things. Decorating is not one of them.

So, here are a few scenes from our home that give the message to all who visit: we're in the spirit!


Jupiter and Camino find the best bed in the house: under the tree!

 A quilt I handstitched years ago is repurposed as the perfect tree skirt!

I love simple window dressings, choosing bits of nature over curtains. Why block out that view of the duck/chicken house? This milkweed pod star fits perfectly within the circle of this berry wreath.

NOELves! I made these when I was a child and my mom recently passed them on to me. How simple, and sweet!

A birchbark star wreath, inspired by my friend Maureen.

A new ornament: a feather inside a glass tear, a gift from my sister Julie.

Last year's homemade stockings, one from vintage velvet and shell buttons, the other from a thrifted sweater and vintage buttons.

Sometimes in the whirlwind of Christmas preparations, it's good to remind yourself to KISS!*
*Keep It Simple, Stupid

Thursday, December 2, 2010

Little Quilts

While the Handmade Holidays movement is appealing to me in terms of resisting consumerism, teaching my children the "real" meaning of Christmas, and showing off my crafty self, I'll admit that this year I'm handcrafting my children's gifts because I'm flat broke. There is really nothing left at the end of the month, with mortgage and childcare payments, and part-time pay. Often there's nothing left in the middle of the month, either. Things are about as bad, financially, as they've ever been. It's time to put snow-tires on the van but there's no money for that. Each month we wonder if we can hang on a bit longer (till I go back to full-time work) or if we should think about selling the homestead.

I don't think I would be alone in acknowledging the fact that choosing to live simply is based in large part on our income. It would be much easier to just go out and buy gifts, pyjamas, etc. for my kids for Christmas. And I know that a day might come where the little handmades I offer don't seem like "enough". But my mom mentioned the other day how lucky I am that my kids don't watch TV the way we did when we were kids. They really have no idea what's out there in terms of toys. When I asked them what they'd like Santa to bring, they were kind of stumped. So, anything new-to-them that's wrapped and under the tree will bring as big a thrill as some shinily-packaged, plastic-wrapped, store-bought gift.
I'm trying to kick the Facebook habit that has begun to absorb much of my "spare" time. Last night, instead of sitting there like a crackhead, chatting with friends and looking at other people's photos, I sat at the kitchen table and sewed these two quilt tops. We plan to repaint a small bunkbed, crib, and rocking chair for the girls, and present them with a little doll nursery, complete with colourful little quilts. The nine-patch is one of the easiest of quilt patterns: just cut out five squares of one colour, and four of another, and sew them together to create a checkerboard. Lots of these blocks will use up your scrap stash, and could turn into a quilt of any size you wish!

You can find a tutorial for log-cabin blocks here.

Every year I plan to send Christmas cards. "Plan" is the operative word, here. As a schoolteacher, December is particularly busy for me: with the normal decorating/baking/gift-making/etc. that goes into preparing my home, I also create gifts for my students, plan and rehearse our Christmas concert performance, transform the dramatic play centre into a Toy Shop, and so on. But with my rediscovered, Facebook-free time last night, I stitched this little patch, which I will glue onto cardstock. To keep things within reason, I've decided to send cards only to friends and family I see/talk to regularly, instead of to everyone in my address book. I know the ease with which I get overwhelmed. I love the word "peace"...and dream of really feeling it in my heart this holiday season.

Wednesday, November 24, 2010

Handmade Holiday: Wee Things

In anticipation of Advent, several friends and I create handmades to share: 5 friends, 5 items times 5. We all end up with 25 unique gifts for our children to open, one at a time, on each day leading up to Christmas. Tomorrow evening we will gather, wrap our offerings in brightly coloured tissue paper, and attach them to a big stick. I don't know why we tie them to a stick, but it's what we do. We call them Advent sticks!

A month ago when I started thinking about what to make, I actually thought I'd back out this year. Too busy, too tired, too stretched. But then I got into the spirit with a loving nudge from a friend, and here's what I came up with.

A pretty button sewn onto a circle of wool felt, then layered over graduatingly-larger circles makes a lovely (and thrifty!)  ornament

with a message stitched onto the back!

A flock of crocheted snowflakes, each one unique,

silvery,

and intricate.

And last, and possibly sweetest, a tiny bit of fairy work.

Here are the simple directions for this quick gift:
Using 0-2 mm needles, cast on 10 stitches using a fingering weight yarn.
Knit as many rows as you like; I like it to look a bit longer than a square. That would be a rectangle! Break off yarn, leaving a long enough tail to wind into a tiny ball.
Slip the stitches on to a toothpick, and push another toothpick carefully through the work.
To finish, weave in cast on end, glue small beads onto the ends of the "needles", and glue the little ball of yarn onto the front of the work.
You can attach a magnet or a pin or a hanging string, depending on how you want to use this. You can also glue it to the front of a card for your favourite knitter, OR mount it in a tiny frame!

I love wee things, don't you?


Thursday, November 4, 2010

Craft Classes: Felt Crowns

Last evening Maureen (of Twig and Toadstool) and I hosted the second installment of our series of craft workshops, aimed at mamas who want to create beautiful handmade gifts for their children. You can read about the first session here, where we made felt fruits and veggies for our little ones. Both Maureen and I are thrilled to pass on our skills and knowledge, not to mention the perfect excuse it gives us to drop everything and hang out together! As two part-time workers, and full-time mamas, it can be hard to find time to just visit and craft. To do it in the company of other enthusiastic wild women makes it all the more fun!  

Who could resist this rainbow of embroidery floss,

these colourful scraps,

a jumble of pins, needles, and scissors (recognise that toadstool pin-cushion?),

and an opportunity to create a gift of beauty and love?

Patient hands learned blanket stitch, running stitch, and backstitch,

and personalised and embellished with silk flowers, rickrack, ribbon, and buttons.
In spite of the uproarious mama-and-grandma-laughter, this little man dozed off (felt food in hand!)

allowing his mama to stitch this beautiful "L" onto his crown!

A sampling of the almost-finished results! (We used Amanda Blake Soule's crown template, found in her book, "Creative Family").

During these craft-lesson gatherings, the best moment for me is seeing the sparkle of pride dawn on a mama's face when she finally figures out how to make a nice, neat blanket stitch, or finds her finished product looking so much lovelier than she'd imagined it would. Crafty possibilities blossom, and everyone leaves with a feeling of accomplishment and renewed confidence!

Do consider sharing your skills and gifts with the world, either through informal gatherings like this one, where you collectively create an opportunity to create by bringing a bunch of materials (beads, earring hooks, string, feathers, mirrors, paper embellishments, etc.), or through classes. We've been so thrilled with the response to our Handmade Christmas series that we're already planning our Spring sessions!

Visit http://www.twigandtoadstool.blogspot.com/ for details of upcoming classes!