Pages

Showing posts with label thrifty. Show all posts

Wednesday, January 18, 2012

the musical fruit

I'm involved in a whirlwind romance. With beans. Dried beans, to be exact.

I always have jars of them in my kitchen. They look so pretty, all colour and texture, shape and size! But the other day, after a visit with a friend during which she gifted me with these charmingly (and aptly) named Orca beans,

I got those jars out and took a new look at them. I think what always put me off about dried beans is the planning and time involved in preparing them. It always just seemed easier to open a can.


But now all I can think about is beans. Growing them. Soaking them. Simmering them. Sprouting them. Making them into delicious things: dips, soups, or baked beans! In addition to being nutritious, delicious, and versatile, they're cheap AND easy to grow! I got my Terra Edibles catalogue in the mail yesterday and will definitely be checking out their bean selection for this summer's garden.

Beans take care of themselves in the garden. If you just leave them on their stalks, they'll dry right up; for good measure, you can uproot the whole plant once they've dried, and hang them in your barn or basement to finish drying. Then your kids can help unveil the little treasures inside the pods! Store them for eating, and save a few for next year...what could be easier (besides, ahem, opening a can)?

In the past week I've made Black Bean Cilantro Dip (from Jae Steele's Get It Ripe), Yellow Split Pea Soup (from Sarah Kramer's La Dolce Vegan), mung bean sprouts, and split pea and ham soup. Oh, and baked navy beans, too!

I find that soaking the beans overnight, then boiling for one to two hours softens them sufficiently for most recipes. In Feeding the Whole Family, Cynthia Lair recommends cooking your beans with a piece of the sea vegetable kombu. Sea vegetables aren't easy to come by in these parts, but apparently they soften the beans and reduce their flatulent effects!
That little handful of Orca beans made me feel like Jack must have when he bought the magic beans (before his mother berated him for his poor bargaining skills, of course).

Now I'm hooked on beans as I journey towards a healthier, more whole way of eating.

Tuesday, January 17, 2012

Christmas Card Garland

It occurred to me to take a picture of this unexpectedly pretty and tidy corner the other day. I liked the simplicity of it.

The rocking chair was a gift from my parents, made by hand by my Grade Nine English teacher, who uses only traditional wood-working tools and local trees to create his beautiful work.

The quilt was made by me, and I never tire of its rustic plaids and sweet little pine trees.

The poster I got in Montreal after I saw it in a friend's apartment. It's travelled with me for almost fifteen years now, and suits every room I've hung it in.

The garland? Well, that you can make, if you haven't thrown out all those Christmas cards yet!
I can't even remember where I saw this idea. If you did it on your blog last year, let me know and I'll link to you!

Simply trace around the top of a mason jar to create circles out of the most interesting part of our old Christmas cards . Cut them out and hole-punch them on two sides. Then thread a ribbon through them, linking them all together.

 So simple, right? And thrifty. And quick. And best of all: pretty.
Over the years I hope to have one of these over every window; these cards are from last year, so I'll soon make this year's cards into a new garland.

I can't help but imagine this done with rainbow paper or printed scrapbooking paper...imagine them as birthday streamers! Oh...must try that soon....don't you love how creating spurs on your creativity?

Sunday, January 15, 2012

Thrifty: Repairing My Favourite Sweater

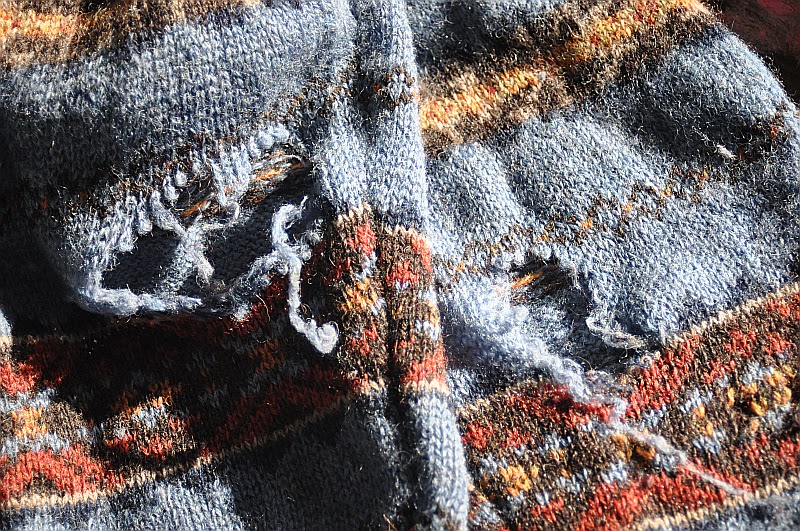
My favourite sweater was purchased in August 1997, just before I headed up North to teach for a year. I was twenty-three years old, and just embarking on my teaching career. I loved this sweater. Blue, rust, chocolate brown, gold, all in a classic pattern. Plus, it was a cardigan. I wore it with jeans, I wore it with dresses, I wore it with skirts, I wore it with nightgowns.

The trouble is, this sweater was 100% wool. Warm, yes. Durable? Not so much. Wool tends to wear through wherever there's any steady rubbing or pressure. So, with time, the elbows gave out. A moth or a mouse nibbled a small hole near a button.


There were times when I thought I'd just felt the thing in the washer and make slippers out of it. But I just couldn't bring myself to do it. It's everything I want in a cardigan: nice fit, not too thick, beautiful colours, classic design. I just couldn't do it.

Today was what we call a "Two Fire Day" (fires in both the wood furnace and the kitchen woodstove); it was that cold. It was the day to fix my sweater.

 First I had to choose a fabric that would be both complimentary and quirky!
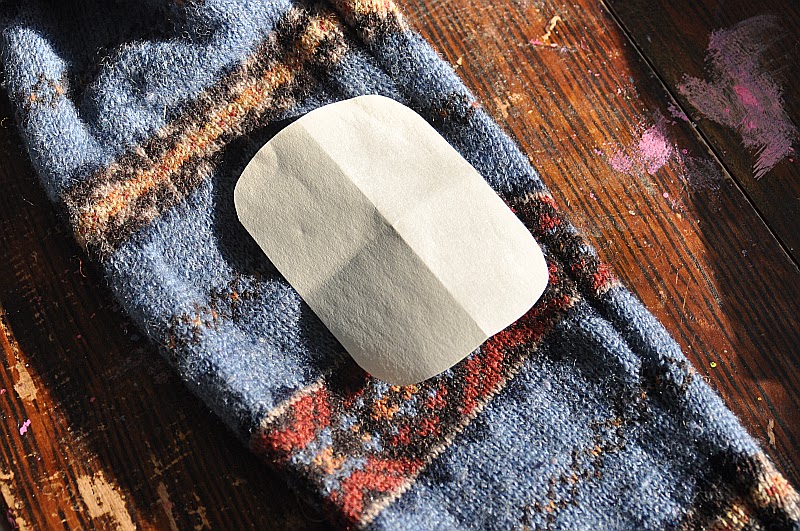
 Next, I created a pattern for a patch large enough to generously cover the holes.
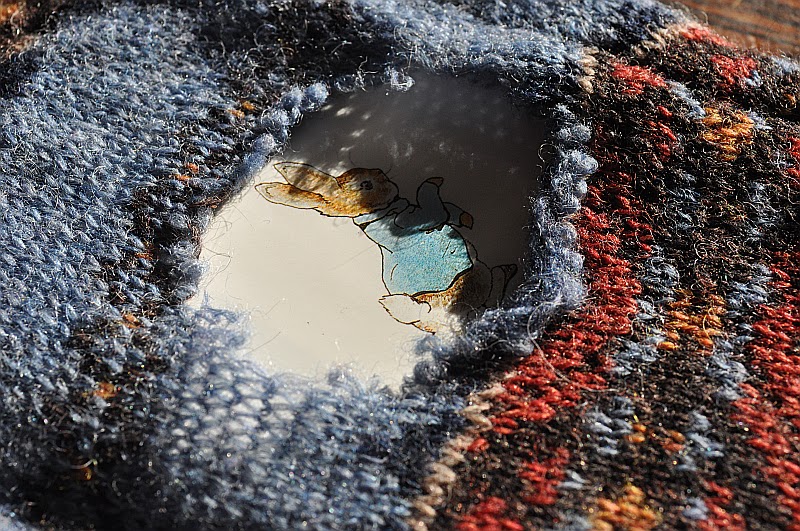
 A small book inserted inside the sleeve offered a good flat surface on which to stitch (and ensured that I don't catch the other side of the sleeve). Peter Rabbit is the perfect size!
 Using an iron, I pressed a rolled hem around the edges of the patch, then used embroidery floss to stitch it onto the elbow of the sweater.
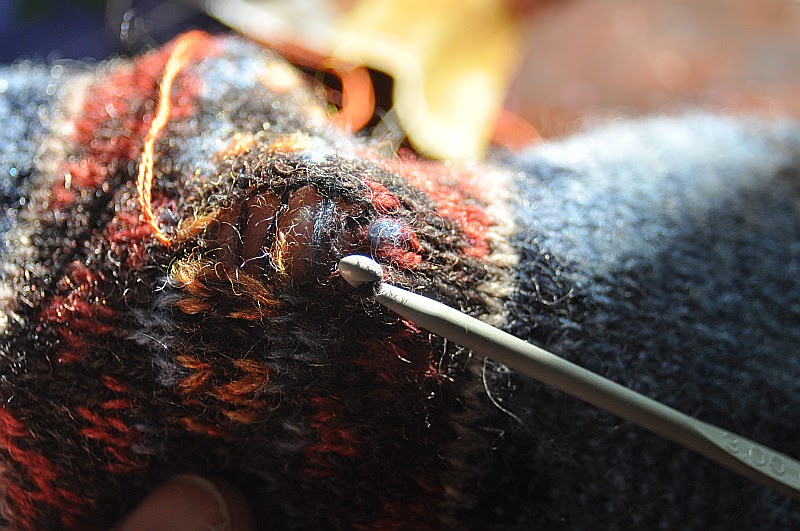
While sewing, I noticed a few stitches that were beginning to "ladder", so used a crochet hook to pick them back up, then secured them with a stitch.
Not so scholarly as leather patches on tweed, this dear sweater of mine feels even more mine with the addition of pretty patches.

The patch over the hole in front wanted to be a heart-shape. Now, instead of looking ragged and worn, this beautiful garment has years of life in it, and will be worn proudly until I wear through the patches.

Tuesday, September 20, 2011

A Letter at Christmas, AND a Promotional Discount!

I've calculated that since giving birth to my first child six and a half years ago, we've celebrated Christmas with kids six times, and acknowledged twelve birthdays. I did the math: that's eighteen opportunities for our loved ones to give gifts to our kids. That's three sets of grandparents, five sets of aunts and uncles, plus the gifts we give.


So the question is: how do you politely request certain kinds of gifts for your children? We have been blessed by many grownups that love our children and don't ever want to seem ungrateful. It's just that after so many years, I have had to discard so many cheap plastic/battery-powered toys, or worse, toys that cost lots of money BECAUSE they were battery-powered. They still break. We're overwhelmed with boxes of stuff our kids don't really play with, or those toys that have so many parts it's impossible to keep them together.
About four or five years ago, Mothering Magazine featured a letter that could be sent to friends and relatives well before the holidays to polite state your intentions for your children. I've always felt a bit unsettled about sending it...like I was being difficult, or a toy snob, or taking the fun out of the mad consumerism of Christmas. But I think this is the year.


After visiting a friend's small and beautiful home, I was inspired to take things in hand. The limitations in space demand that her daughter's toys are well-chosen. A few baskets of Waldorf toys (play silks, wooden tree blocks, felt fruit and vegetables, a little wooden play kitchen, and so on). I breathed of sigh of peace at the sight of these beautiful toys. My children HAVE toys like this. But they're so bound up with all the other "stuff" that they're hard to find.

So, upon returning home from her house, I fired off this email:

Relatives and Friends,

I'm just thinking ahead to Christmas (and the many birthdays ahead of us) and the INSANE amount of toys we have in our house. I would like to gratefully acknowledge the wonderful gifts you've given over the years, and respectfully request a certain "kind" of gifts this year. We're working hard at simplifying the "stuff" in our house, and are ditching a lot of toys that have broken over the years, or requires constant battery changing, or was brought into the house from yard sales, thrift shops, etc.

We just have too much; the kids don't even know what to play with anymore, pieces have gone missing, and we're always struggling to keep the toys in order.


So, as we attempt at achieve a bit more order in our busy house, I'd like to ask you to consider checking out www.babynaturopathics.com or www.naturalpod.com which are both Canadian businesses that support handmade/natural toys. We'd LOVE to build a collection of Holztiger animals (available at the first site)...we love the farm animals, daughter, farmer, and princess/queen/king/etc. kind of figures. Natural pod carries "Baby Bolga baskets" which would be so handy for the kids as they wander on their adventures (eggs, berries, apples, beach treasures!) , as well as beautiful coloured play silks (which are marvellous for dress up and imaginative play).

Visit http://www.naturalpod.com/ to order!

Please, no plastic toys this year, or toys with tons of little parts that will get lost...there's no need to spend tons of money on wooden stuff; a lot of the items I've mentioned are around $10.
Find this beauty of a marble run on etsy!
If you enter the code KnittyGritty11, you'll get a 5% discount, and so will I!
Kirk's wife Erin grew up near my hometown; they're good people. Support real craftspeople!


Jude is really into experiments and building stuff; we hope to get him a wooden marble run on etsy (made by Erin Egan's husband, Kirk); he already has a microscope, but would probably love a magnifying glass, or a small aquarium/terrarium, or anything that allows him to keep things from nature to study! He also loves drawing and music as usual.

Other ideas include: an amaryllis bulb that they can watch bloom in the winter months, gift cards to a bookstore, a bug-viewing kit, art supplies, or camping gear (a flashlight, an enamelware cup and bowl), contributing towards lessons or classes, or just making a date to spend time together!


I hope no one thinks me rude...this is the desperate plea of a desperate mother; I really want to pare down the amount of stuff in our house and have found through experience that the toys my kids keep returning to are the open-ended, natural ones...they feel nicer, last longer, encourage imagination, and don't need batteries or make annoying noises. They are made by hand, with little or no impact on the earth. These are the values we hope to pass on to our children, and hope you can help us!


Thank you for reading through all these mama thoughts of mine, and for respecting our request!


With all that said, please know that our children do not expect gifts; they do not keep track (nor do we!), and always remember the joy of being with loved ones when they talk about Christmases past.

We so appreciate your role in our children's lives, and appreciate the love you show them by choosing gifts thoughtfully.

With gratitude,
Stephanie

When I mentioned in yesterday's blogpost that I'd written this letter, several people commented on my courage. It's less courage (because it's taken me six years!) and more that I really, really want to stop stepping on sharp plastic toys. I want to feel peaceful when I see my children's toys. That, I hope I can achieve with words.

If you're feeling similarly fed up, and possibly courageous, please feel free to copy or adapt my letter! You can replace the Canadian sites with others (I also love Nova Natural Toys in the US!), or tailor it to reflect your child's interests.

It is time to do more than THINK about making change. I'm the person who picks up messes and has to dispose of broken craptastic toys (with the eco-guilt that entails). So I'm taking charge of what comes into my house. I should have done it years ago, but I'm starting now instead!

Tuesday, January 25, 2011

Baby, Remember My Name

I have an auto knitter. It’s a hand-cranked, designed-during-the-industrial-revolution sock-knitting machine. By machine, I don’t mean something with a plug that does all the work for you. I mean a heavy cast-iron thing with gears and screws and needles and a carriage. You sit and crank, carefully counting rows, create a heel, crank some more, and create a toe. It takes all of an hour to make a pair of socks, once you factor in picking up dropped stitches and grafting the toe. These were my go-to gift for several years. After our move to the homestead, the pieces got divided amongst boxes, the needles stored somewhere safe. The place I chose was so safe that I’ve been unable to find them. So, the Autoknitter is sitting idle, patiently awaiting my return.
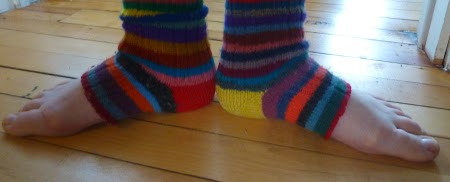
All the socks I made on it have worn through at the ball of the foot, but I haven’t had the heart to just throw them out. I don’t want to waste the time and yarn I used just because the toes have worn through. So I kept them in a pile for years.


The other day I got a notion to cut the toes off. And I’m thrilled with the result! I like to be barefoot, but our wood floors are chilly in the winter. These little babies keep my ankles and legs warm, but give my toes freedom!


Plus, I feel like a dancer from Fame, all calloused feet and slouchy legwarmers. I’m gonna live forever!

Sunday, December 19, 2010

Handmade Holidays: Down to the Wire!

Inspired by Amanda's Solstice pyjamas, my friend Maureen and I created these Christmas pjs over two craft sessions. On the first night, we sewed the pants (perhaps a tutorial in the New Year?); the stitch ripper got some exercise, but Maureen diligently learned to put in the waistband elastic!

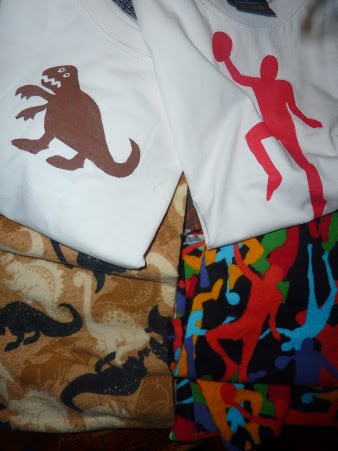
Our second session involved creating matching tops, using plain shirts and fabric paint. I realised after painting the apple on the white shirt below that the seeds are NOT that close to the skin, but I doubt Violet will notice! I'm really pleased with the way Jude's dinosaur turned out!


These slippers were inspired by this post! I'd been hanging on to this whimsical felted wool sweater, unwilling to cut it up until I found the perfect project...turns out this was it! It honestly took about 30 minutes to make this one slipper! I can't give them away, so they're my handmade gift to ME! I just love them: the fit, the colours, the little crocheted cuff...they're just so sweet! They'll definitely be on my New Year's "to make before December 2011" list!
Another lovely idea that is QUICK involves turning vintage women's watches into photo-bracelets. I saw this in a magazine years ago and would give credit if I had the slightest notion what it was. But I don't. The picture of my hubby (on the right) was taken in the first week we met, and the baby niece in the other photo is now twelve, so that should give an idea of how long ago I made these!

10 years ago you could find these old watches relatively cheaply at thrift stores and yard sales. Just remove the back plate, trace it onto a photo, place the photo in and replace the back. Voila! These look so lovely and charming when worn together in a group. The patina and unique details of these vintage pieces of jewellery rival any "fake vintage" stuff out there. Ask your mom or grandma if they have old watches kicking around...


And last, possibly most insanely, but definitely not least:

Quite belatedly, I decided to try my hand at some Waldorf-style dolls for my girls. We're cleaning up some old thrifted furniture (doll bunk beds, cradle, and rocking chair), and I've sewn some doll-sized quilts. Naturally, the only thing missing is a pair of dolls! We have your usual garden-variety craptastic dolls, given to us and picked up at yard sales over the years. None of them is a favourite with my girls, but somehow they continue to multiply. I've decided to get rid of them all! They have no charm, no spirit, no personality!

Using a tutorial I found here, combined with previous doll-making experience, I sat down last night to craft the heads. I'm really quite happy with how they turned out; they look friendly without simpering, sweet without being saccharine. Of course, those little quiffs on top of their heads make them look like Casper the Ghost (as my ever-observant hubby pointed out)...so now the challenge is creating hair. I acquired some beautiful mohair from a friend down the road and crocheted this wig base:

This is the second attempt and my (ever-helpful) hubby said "Achtung!" to both (because he thinks these so-called wigs look like WWII German helmets). Sigh. I'm out of this colour so can't loop longer pieces through this so-called base. Time's a-ticking...but for now, this elf is off to bed. I'll do a whole post about these little dollies if/when they come to fruition. This is looking like a last Handmade Holiday post, for this year anyway.

Thanks to Tonya at Plain and Joyful Living for inspiring and hosting this wonderful blog-share!


Sunday, December 5, 2010

The Moodie Flip Doll: A Tutorial (Kinda)

My sweet niece turned 7 today! She is unique in many ways, and therefore it is often a challenge to find a gift for her. I just couldn't settle on anything, either store-bought or handmade, until this morning...4 hours before we hit the road for her birthday party!

Meredith's nickname is "Moodie"; I'm not sure where it originated, but it's what we all call her. When I woke up, it came to me that I had to create a Moodie Doll for her.

I started out with a pattern for Emily Martin's Black Apple Doll, times two, and minus the legs (complex mathematics)! I freehanded the faces, one happy and one sad. For the eyes, I used satin stitch, then small back-stitches around the iris.
Close-up of satin stitch (basically, filling in an area with long stitches)

Tiny backstitches  define the filled-in area and tidy up the edges.

The completed faces, with hair laid on!

I used backstitch for the eyebrows, lips, and around the eyes as well. Follow Emily's instructions for sewing the hair onto the face, then the head, arms and bodies. At this point, I had two Black Apple Dolls with no legs.

She is very sad, wondering where her legs went.
For the skirt, I cut a length of fabric about three times the width of the doll's body, and long enough to cover the doll from head to waist. Choose a print that doesn't have a "wrong" side. I ironed up a hem, and sewed some rickrack onto the turned-up side to cover the hem.

I sewed a seam to connect the two short ends of this rectangle, creating a tube. I did my own version of a French seam along this side seam to make it look finished on both sides. I then added a loose gathering stitch along the top of the skirt, and gathered it until it fit onto the doll's waist.

I sewed this onto the "happy" doll, the way you would a skirt to a top (right sides together). This is how it looked at this point, with the doll's body stuffed:

I then took the "sad" doll, and ironed a hem up into her waist. I stuffed this half of the doll, flipped the other half upside down, and hand-stitched the sad half onto the happy half. This covered the rough edge where the skirt joined the upper half.

Please be reminded that I called this a "Tutorial (Kinda)"...I was making this up as I went along, with a clingy child leaning on my arm as I worked. Email me if you seriously want to attempt to follow my half-assed instructions and still have questions (I can't imagine how you would...!)...I call this kind of rudderless creating "organic"...it evolves as I work, and I just trust that as problems arise, I'll deal with them. I do like the fail-proofness of following a formula, recipe, or pattern. But honestly, this project gave me so much satisfaction, to bring a seed of a plan into fruition! What have you got to lose, besides time and a bit of fabric?
 
Here is what she looks like in mid-flip.

I made the sad doll's torso a bit too long. I also sewed her hands together in front (as if clasped in shame!) because they were causing the skirt to stick out too much when flipped.

Curiosity got the better of Miss Violet and she had to check out what was going on under that skirt!

While I did learn to sew from patterns, "winging it" is much more my style. I love how this doll turned out, and love how her name is so fitting for our sweet Moodie. She fit perfectly inside one of those skinny wine-bottle gift bags which made me giggle. Let me know what you think, and if I ever make another I'll take more pictures to give clearer instructions! For now, just go for it...winging it just might bring a little thrill to your life.

Thursday, December 2, 2010

Little Quilts

While the Handmade Holidays movement is appealing to me in terms of resisting consumerism, teaching my children the "real" meaning of Christmas, and showing off my crafty self, I'll admit that this year I'm handcrafting my children's gifts because I'm flat broke. There is really nothing left at the end of the month, with mortgage and childcare payments, and part-time pay. Often there's nothing left in the middle of the month, either. Things are about as bad, financially, as they've ever been. It's time to put snow-tires on the van but there's no money for that. Each month we wonder if we can hang on a bit longer (till I go back to full-time work) or if we should think about selling the homestead.

I don't think I would be alone in acknowledging the fact that choosing to live simply is based in large part on our income. It would be much easier to just go out and buy gifts, pyjamas, etc. for my kids for Christmas. And I know that a day might come where the little handmades I offer don't seem like "enough". But my mom mentioned the other day how lucky I am that my kids don't watch TV the way we did when we were kids. They really have no idea what's out there in terms of toys. When I asked them what they'd like Santa to bring, they were kind of stumped. So, anything new-to-them that's wrapped and under the tree will bring as big a thrill as some shinily-packaged, plastic-wrapped, store-bought gift.
I'm trying to kick the Facebook habit that has begun to absorb much of my "spare" time. Last night, instead of sitting there like a crackhead, chatting with friends and looking at other people's photos, I sat at the kitchen table and sewed these two quilt tops. We plan to repaint a small bunkbed, crib, and rocking chair for the girls, and present them with a little doll nursery, complete with colourful little quilts. The nine-patch is one of the easiest of quilt patterns: just cut out five squares of one colour, and four of another, and sew them together to create a checkerboard. Lots of these blocks will use up your scrap stash, and could turn into a quilt of any size you wish!

You can find a tutorial for log-cabin blocks here.

Every year I plan to send Christmas cards. "Plan" is the operative word, here. As a schoolteacher, December is particularly busy for me: with the normal decorating/baking/gift-making/etc. that goes into preparing my home, I also create gifts for my students, plan and rehearse our Christmas concert performance, transform the dramatic play centre into a Toy Shop, and so on. But with my rediscovered, Facebook-free time last night, I stitched this little patch, which I will glue onto cardstock. To keep things within reason, I've decided to send cards only to friends and family I see/talk to regularly, instead of to everyone in my address book. I know the ease with which I get overwhelmed. I love the word "peace"...and dream of really feeling it in my heart this holiday season.

Monday, November 15, 2010

Craft Classes: Tree Blocks!

With the simplest of raw materials (wood, beeswax, olive oil, and cotton) you can create a set of tree blocks that are sure to outlast any toy you pick up at the nearest big-box store.

Just saw wood of varying diameters into rounds, and sand the ends and edges, as well as any loose/rough bark.


Slather with a generous coat of beeswax polish, and let sit for at least a few hours.


Buff to a sheen, then store in a lovely drawstring bag. You can personalise it with fabric paint and a potato stamp!

Imagine the delight of small hands opening this beautiful gift...and how clever you'll feel at your creativity, thrift, and eco-friendliness!

Visit http://www.twigandtoadstool.blogspot.com/ for more details!

Saturday, November 13, 2010

Tutorial: Clothing Swap!

Every once in awhile, when our closets seem too full and we're bored with what's in them, we (our circle of women) organise a Clothing Swap. It often corresponds with someone's birthday or another occasion. It happens at night, with wine and appetizers, or in the afternoon, with tea and cookies. We mostly bring women's clothes, but sometimes include children's and men's clothes. We bring shoes, scarves, gold shorts, orange pants, feathery shirts...anything goes!

Shanti explains the "rules" to new swappers.

Here's how it works: we all gather, visit, nibble, then the magical moment arrives when someone says, "Swap time!" We all grab our bags/baskets/boxes of clothes, and DUMP them in the middle of a large space. Then the free-for-all begins. Sometimes there's good-natured screaming and scrambling. Sometimes there's a wear-off, if one item is desired by two (where both parties model it and we kindly decide who wears it best). Often there's a kindly, "Oh, this looks like it would fit you!" Don't take the time to try everything on at first; just stash it behind you. When the frenzy has died down, try everything on, and put back anything that doesn't fit/look right.

Loot bags for women!

The mountain of wardrobe riches...

Score!

Picking through the treasures.
Once the clothes have been thoroughly picked through (and stirred and picked through again), we often have a fashion show, showing off our best score of the night! The clothes that are left behind (and there are usually lots) are bagged and donated, and everyone goes home with a few "new" (free!) articles to add to their wardrobe.
Swaps allow for creative expression and wild ensembles.

And of course, someone always brings (or models!) funny lingerie...

If you're feeling bored with your wardrobe, or overwhelmed with the mountain in your closet, now is the time to organise a clothing swap...just make sure you don't leave with more than you brought!