Showing posts with label crafts. Show all posts
Monday, September 30, 2013
Tuesday, January 17, 2012
Christmas Card Garland
It occurred to me to take a picture of this unexpectedly pretty and tidy corner the other day. I liked the simplicity of it.
The rocking chair was a gift from my parents, made by hand by my Grade Nine English teacher, who uses only traditional wood-working tools and local trees to create his beautiful work.
The quilt was made by me, and I never tire of its rustic plaids and sweet little pine trees.
The poster I got in Montreal after I saw it in a friend's apartment. It's travelled with me for almost fifteen years now, and suits every room I've hung it in.
The garland? Well, that you can make, if you haven't thrown out all those Christmas cards yet!
I can't even remember where I saw this idea. If you did it on your blog last year, let me know and I'll link to you!
Simply trace around the top of a mason jar to create circles out of the most interesting part of our old Christmas cards . Cut them out and hole-punch them on two sides. Then thread a ribbon through them, linking them all together.
So simple, right? And thrifty. And quick. And best of all: pretty.
Over the years I hope to have one of these over every window; these cards are from last year, so I'll soon make this year's cards into a new garland.
I can't help but imagine this done with rainbow paper or printed scrapbooking paper...imagine them as birthday streamers! Oh...must try that soon....don't you love how creating spurs on your creativity?
Tuesday, October 25, 2011
Felt Nesting Dolls
It's that time of year, just before Halloween, when one starts to think about Christmas. At least I do. I imagine most mothers are like me...as the days get shorter, our hands start to itch with wanting to make stuff. Usually, this time of year sees me busily crafting five times five little items to share with other mama friends, to create our beautiful Advent Sticks. This has been a beloved tradition for the past four years.
This year, we collectively decided that we're busy enough with work, housekeeping, the various animals in our care (dogs, cats, chickens, bees, horses, etc.), and our children's extra curriculars (hockey, stepdancing, piano, singing, etc.), and that maybe this year we could...well...ease off a bit.
This led us to decide that we'll each craft five items only, to share with one another at a gathering sometime before Christmas. We'll add in a bottle of wine (or three) to the gathering, and all will be merry!
I had already begun these little felt Russian Nesting Dolls (they don't really nest!), and have decided that these will be my gift to my dear friends in crafting, mothering, and everyday life. Traditionally, these dolls come in all varieties; I've seen nesting angels, and a nesting Farmer in the Dell set.
The pattern came from Better Homes and Garden's Holiday Crafts magazine, which I buy every year at the grocery store. It's well worth the cost; this year's edition contains many lovely felt projects, with wonderful patterns. I have a few others on the go and will share as I complete them.
This year, we collectively decided that we're busy enough with work, housekeeping, the various animals in our care (dogs, cats, chickens, bees, horses, etc.), and our children's extra curriculars (hockey, stepdancing, piano, singing, etc.), and that maybe this year we could...well...ease off a bit.
This led us to decide that we'll each craft five items only, to share with one another at a gathering sometime before Christmas. We'll add in a bottle of wine (or three) to the gathering, and all will be merry!
I had already begun these little felt Russian Nesting Dolls (they don't really nest!), and have decided that these will be my gift to my dear friends in crafting, mothering, and everyday life. Traditionally, these dolls come in all varieties; I've seen nesting angels, and a nesting Farmer in the Dell set.
There's something so sweet and charming about the Peasant Mother style of Matryoshka, though, isn't there? Even the name sounds maternal. Our little circle of mamas is not comprised of blondes in kerchiefs, but the sentiment is the same.
The serene face, the healthy figure, the roses in the cheeks: these are mamas that have found their wisdom and peace in their roles.
They embrace the busyness of their lives, and know when to take a moment to rest.
They also have great fashion sense, and looked so sweet near this red bowl of eggs that I couldn't resist adding it as a prop to this photo shoot!
The pattern came from Better Homes and Garden's Holiday Crafts magazine, which I buy every year at the grocery store. It's well worth the cost; this year's edition contains many lovely felt projects, with wonderful patterns. I have a few others on the go and will share as I complete them.
Wednesday, July 27, 2011
Sand Crafts: Part 2
When we finished our sand castle craft, I had a messy table and bowlful of glittery sand...
I recognised it as an opportunity for an unplanned, spontaneous, and especially QUICK craft! If you have multiple children, you know the challenge of finding a craft that works for everyone...not too hard for the littles, not too boring for the elders! This craft fits the bill.
You will need:
Paint a whole sheet of watercolour paper with blue watercolour paint.
Using the watered-down glue from the sandcastle craft, paint the bottom part of the paper.
Using a finer brush, paint a sandcastle shape.
Sprinkle it all with sand, then gently shake off.
We did the whole thing on wet paper...the sand stuck to everything, but once it all dried, the sand was easily brushed off. All that was left was the sand on the gluey parts!
Add a jaunty flag or two to the top of the sandcastle.
Enjoy!
I recognised it as an opportunity for an unplanned, spontaneous, and especially QUICK craft! If you have multiple children, you know the challenge of finding a craft that works for everyone...not too hard for the littles, not too boring for the elders! This craft fits the bill.
You will need:
- blue watercolour paint
- watercolour paper
- glue, slightly thinned with water, OR Mod Podge
- brushes
- sand, sifted, with glitter added in for fun (optional!)
- craft paint, various colours
Paint a whole sheet of watercolour paper with blue watercolour paint.
Using the watered-down glue from the sandcastle craft, paint the bottom part of the paper.
Using a finer brush, paint a sandcastle shape.
Sprinkle it all with sand, then gently shake off.
We did the whole thing on wet paper...the sand stuck to everything, but once it all dried, the sand was easily brushed off. All that was left was the sand on the gluey parts!
Add a jaunty flag or two to the top of the sandcastle.
Enjoy!
Sunday, July 24, 2011
Sand Crafts: Part 1
To create a sweet sandcastle that no wave will wash away, you will need:
- sand
- gold glitter (optional)
- white glue, slightly watered down (or Mod Podge, left as is!)
- a brush
- paper tubes (from toilet paper or paper towel)
- small twigs, and small amounts of coloured paper
Sift the sand to clean out any rocks and twigs. Add optional glitter.
Using scissors, cut tubes into different heights, then cut little "turrets" into the tops.
Cover tube with glue, then roll in sand (didn't manage to photograph this step: picture one mama, and three kids with glue and sand on their hands!).
Cut little triangles out of paper, and glue on twigs.
Set everything aside to dry!
Glue everything together (I used WeldBond); secure with clothespins till it is all dry.
Display artistically for a lovely indoors beach scene!
Wednesday, July 6, 2011
Creating Order
I KNOW I'm not alone in feeling that I work in my house all day, only to have my husband arrive home from work to a house that looks like a bomb went off. These humid days, my hair is in a frizzy halo, my shirt is sweaty and dirty, and I have that incredulous look on my face. I MUST'VE worked all day because I'm exhausted and my feet hurt...but where are the results?
You know what the day is like with small kids: you just go from one disaster to the next, one mess to a bigger mess; they manage to undo in minutes what it takes me an hour to accomplish. It's enough to make you cry, tear your hair out, gnash your teeth, and beat your chest in frustration. Playdough to painting to splashing at the sink to requesting more food to pulling all the books off the shelf in search of the one perfect story...
It is sometimes hard to remember that PLAYING IS A CHILD'S WORK. They really aren't doing this to drive you crazy. It only feels that way. They are impulsive beings, children, and don't worry about the mess they leave behind...they just look ahead to the next fun thing they can get into.
It's taken me years to get to today...to a point where I feel like I have the energy, creativity, and desire to create some order in my house, after years of childbearing and exhaustion. Children ages 2-6 ARE capable of cleaning up after themselves. It works like magic in my classroom; I just start singing "Now it's time to tidy up, tidy up, tidy up, now it's time to tidy up and put our toys away!" (to the tune of London Bridge), and off they go, like little automatons, sorting toys into their appropriate baskets, putting things on shelves, sweeping up sand, carefully stacking blocks, cooperating. I'm amazed, every single day.
The neat thing about a Kindergarten classroom is that everything is at a child's level. They don't have to ask me if they can paint, because the paint is accessible to them at all times. I'm starting to apply the principles behind order in the Kindergarten classroom to my home, to great success (so far)!
You know what the day is like with small kids: you just go from one disaster to the next, one mess to a bigger mess; they manage to undo in minutes what it takes me an hour to accomplish. It's enough to make you cry, tear your hair out, gnash your teeth, and beat your chest in frustration. Playdough to painting to splashing at the sink to requesting more food to pulling all the books off the shelf in search of the one perfect story...
It is sometimes hard to remember that PLAYING IS A CHILD'S WORK. They really aren't doing this to drive you crazy. It only feels that way. They are impulsive beings, children, and don't worry about the mess they leave behind...they just look ahead to the next fun thing they can get into.
It's taken me years to get to today...to a point where I feel like I have the energy, creativity, and desire to create some order in my house, after years of childbearing and exhaustion. Children ages 2-6 ARE capable of cleaning up after themselves. It works like magic in my classroom; I just start singing "Now it's time to tidy up, tidy up, tidy up, now it's time to tidy up and put our toys away!" (to the tune of London Bridge), and off they go, like little automatons, sorting toys into their appropriate baskets, putting things on shelves, sweeping up sand, carefully stacking blocks, cooperating. I'm amazed, every single day.
The neat thing about a Kindergarten classroom is that everything is at a child's level. They don't have to ask me if they can paint, because the paint is accessible to them at all times. I'm starting to apply the principles behind order in the Kindergarten classroom to my home, to great success (so far)!
I started out by putting all the materials necessary to paint into this yard sale find: a low wooden crate. When Margot asks to paint at 7:30 a.m., I pull out a dollar store palette (at right), fill each little space with a different colour, (naming them with her as I go), and pull a brush from the jar at the left. When she's done, I cover the palette with plastic wrap, and when she inevitably asks to paint AGAIN, I'm all ready to go. This has made an activity that used to make me groan into something quick and painless. Please note that this is NOT at her level; at this point I still want some control over the paint mess! Once the day is over, I clean the palette, and stow it back in the crate, all ready for the next morning's creativity.
Another problem area is the living/play room. A large basket was what we used to store everything, all jumbled together. I'd half-heartedly sort stuff now and then, only to find it all jumbled up in the big basket again. Children do not play well with toys that are a)too numerous and b)too messed up. Since Jude mostly plays at his desk with Lego now, I made up these two baskets (purchased at Giant Tiger!), using white craft paint. One holds all the doll clothes, and small dolls. The other is for play food, dishes, etc. The girls are old enough to sort their toys, and tend to play MORE now that there are LESS toys.
Gratuitous close-up of my dream house...
Another GREAT idea (and one that I used when Jude was two and in speech therapy) was to photograph certain types of toys (e.g. cars, animals, people, blocks), laminate the photos, and stick them onto bins. At two, though non-verbal, Jude was able to find the toys he wanted, and could help put them back in their own place. Sorting is an important skill for early learning, and being able to "help" is so very empowering for little ones.
Playdough is right at my kids' level, so that if they want to play with it, they can grab it. Yes, I bought playdough. Yes, I have a recipe for homemade...I just don't have time to make it, am always out of cream of tartar, and noticed that the storebought kind costs less than two dollars for four colours. Just in case you were going to offer me your recipe...ha!
Workbooks and colouring books are also at my children's level, as are blank paper, markers, and crayons. Scissors and glitter are kept out of their reach.
It takes a bit of time and effort to organise your house for little ones. But once they feel a sense of ownership for their toys and learning tools, they are likely to take more pride in them, which will hopefully lead to more responsibility. I remind my children about how nice it is to know where their things are. I feel that children are capable of reaching a target, as long as they know what that target looks like. If for you it looks like your kids tidying up after themselves, well...they can do it.
They really can...I've seen it with my own eyes. I haven't seen it in my own house yet, but I have hope that by taking little steps like the ones above, my children will start helping me accomplish that of which I dream: a somewhat tidy house at the end of the day.
You need not spend piles of money on fancy storage systems. All of my baskets come from yard sales and Value Village, or Giant Tiger if I find them on sale. Baskets are a pretty way to contain any mess! Be creative, and remember: LESS is always MORE when it comes to toys for your kids. Think quality, not quantity (unless it's playdough...then think cheap and easy!...heehee!)
Labels:
art matters,
children,
crafts,
creating order,
magic of creativity,
mess
Sunday, June 5, 2011
Simple Bank Tutorial!
I still do my banking at our little village bank where I opened my first account about 30 years ago. I know...small towns rock.
My children are beginning to show an interest in money. We've never done allowances, or money bribes (say, to get them to practice reading or make their beds); with the pervasive use of chip cards, they haven't had much experience with spending money. Jude has started pocketing spare change he finds scattered around the house. I take back the loonies and "toonies" (for you non-Canadian readers, we have a one-dollar coin in Canada with a picture of a loon on it (hence, loonie); our two-dollar coin has a polar bear on it, and is called a toonie...quaint, isn't it?) but leave him the rest.
When the two older children received cash from their aunt and uncle for their birthdays, I knew it was time to start teaching them about money. Although I realised it would be loads of fun for them to go to the nearest Walmart and blow it on some crappy toy, I also want them to see that saving money, or at least a portion of their "income", will allow their money to "grow"...into a larger, better-quality toy, for instance, or possibly a new pet!
All they needed was a place to save their money and to watch it grow...
A large mason jar makes a perfect "bank"...the growing stash of money is clearly visible, and some can be removed without smashing the whole container!
I used a knife to punch a slot into the top of the lid. You may want to cover the underside of the lid with felt, to cover any sharp edges. Or you may think of a better way to make a slot. But there has to be a slot! Dropping money into a bank and hearing it "plink!" is part of the fun.
You can personalise your bank with a stitched label, if you're so inclined. This was a spontaneous, quickie kind of craft, so I used letter stamps and acrylic paint to make my labels on scraps of cotton.
The kids are delighted to watch their money grow. Teaching your child about money is as important as teaching them to grow a garden (in my opinion!)...managing it, keeping track of it, planning on how to spend it, making it grow.
It's not about becoming millionaires.
It's about wanting my children to have a sense of the value of their money. It's about wanting them to learn to spend it wisely (rather than blow it on poor-quality, momentary pleasures). It's also about having a bit of fun now and then (by, say, spending 50 cents on nickel candies (I remember when they were called penny candies...)).
What lessons do you hope to teach your child about money? And how do you do it?
My children are beginning to show an interest in money. We've never done allowances, or money bribes (say, to get them to practice reading or make their beds); with the pervasive use of chip cards, they haven't had much experience with spending money. Jude has started pocketing spare change he finds scattered around the house. I take back the loonies and "toonies" (for you non-Canadian readers, we have a one-dollar coin in Canada with a picture of a loon on it (hence, loonie); our two-dollar coin has a polar bear on it, and is called a toonie...quaint, isn't it?) but leave him the rest.
When the two older children received cash from their aunt and uncle for their birthdays, I knew it was time to start teaching them about money. Although I realised it would be loads of fun for them to go to the nearest Walmart and blow it on some crappy toy, I also want them to see that saving money, or at least a portion of their "income", will allow their money to "grow"...into a larger, better-quality toy, for instance, or possibly a new pet!
All they needed was a place to save their money and to watch it grow...
A large mason jar makes a perfect "bank"...the growing stash of money is clearly visible, and some can be removed without smashing the whole container!
I used a knife to punch a slot into the top of the lid. You may want to cover the underside of the lid with felt, to cover any sharp edges. Or you may think of a better way to make a slot. But there has to be a slot! Dropping money into a bank and hearing it "plink!" is part of the fun.
You can personalise your bank with a stitched label, if you're so inclined. This was a spontaneous, quickie kind of craft, so I used letter stamps and acrylic paint to make my labels on scraps of cotton.
Using Aleene's Original Tacky Glue, I wrapped a band of colourful fabric around each jar (Jude's fabric is from one of his toddler shirts!) Use the Tacky Glue to stick the label on.
Voila! Done! I love a craft that is this cute, makes little mess, AND is done in about 10 minutes!
The kids are delighted to watch their money grow. Teaching your child about money is as important as teaching them to grow a garden (in my opinion!)...managing it, keeping track of it, planning on how to spend it, making it grow.
It's not about becoming millionaires.
It's about wanting my children to have a sense of the value of their money. It's about wanting them to learn to spend it wisely (rather than blow it on poor-quality, momentary pleasures). It's also about having a bit of fun now and then (by, say, spending 50 cents on nickel candies (I remember when they were called penny candies...)).
What lessons do you hope to teach your child about money? And how do you do it?
Labels:
being Canadian and all,
crafts,
money.,
tutorial
Monday, May 30, 2011
Fairy Tea Party
While I profess to follow the KISS* rule of raising children, I somehow cannot resist the potential of a little girl's birthday party...the food! the decorations! the favours! the costumes! I usually start checking out sites for ideas a few months in advance, jotting down anything that grabs my fancy. I can't really credit any of these ideas to one specific site; they're kind of a reflection of what my mind does with a bit of inspiration!
*Keep It Simple, Stupid!
Wands, created in Northern Ontario from birch bark coloured with watercolour paint, glued on to sparkly fun foam; ribbons and sparkly hearts were added as embellishments, then the whole lot was attached to a sturdy twig with hot glue.
Invitations gently suggested that fairy wings be worn, and every guest complied with joy. Daddy entertained the guests with silly songs, including the faery hokey-pokey..."You put your left wing in, you put your left wing out..."
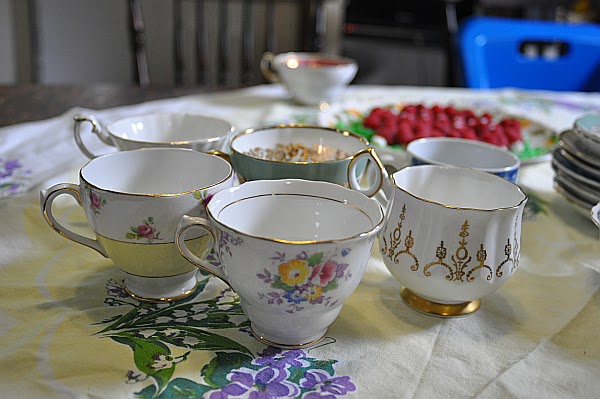
Fancy tea cups are a must for any tea party; if the Guest of Honour's name happens to be Violet, then a tablecloth adorned with violets are a nice touch!
Tiny toadstool hors d'oeuvres...made from pinching one end of a mini-marshmallow and inserting it into a raspberry. Following the note I left before rushing away for the weekend, my husband and his buddy sat up till 2:30 a.m. making these...
...and these: Faery Fruit Wands!
Strawberry cupcakes with buttercream icing, tinted pink, of course...decorated with fresh violets from the garden (of course!)...
Violet requested that mommy wear a "special dress".
Tinkerbell graced us with her presence.
Sweet girl, with pink nail polish (only for a four-year-old girl!)
A wooden play kitchen has been on our wish list for a few years, but there never seems to be the money for one...so I printed off a picture of one I liked from the internet, handed it to my hubby and his buddy (the one with the tools and the know-how!), and sent him off night after night to work on it. I'm so thrilled with what they managed to create without a pattern!
Violet was thrilled, too!
While I did the research and planning of this party, credit for its execution goes to my beautiful man, who so graciously takes on extra tasks when I'm looking like I might burn out...sends me off to the north, stays home alone for a weekend with the kids, doesn't freak out when he realises that I accidentally took the van keys with me (OOPS!), and loads the kids into his little Mazda instead to get groceries for the birthday. Violet felt like the most special little girl in the world for a day, and what more could anyone want on their birthday? My heart overflows.
Labels:
cakes,
celebrations,
children,
crafts,
daddy,
fairy party,
family,
food,
friends,
love,
parenting,
party,
people I admire
Wednesday, May 18, 2011
The Harbinger of Spring
A few weeks (months?) ago, some dear friends gathered for what has become a seasonal tradition: an exchange of handmades, intended to grace our nature tables. We used to create Advent gifts for each other's children (and still do), but felt that the year between each exchange was too long for our creative souls. Now, every few months, we settle on a date to share our goods. The friendship of these women has been an ongoing blessing in my life.
Unfortunately, I missed our Spring exchange, because two out of my three children were ill with fevers and coughs and snotty noses. Still I sent along my contribution:
I could refer to her in no other way but as the Harbinger of Spring. Her knitted dress is a slightly adapted version of Christine Shreier's "Flower Child" dress, found in Living Crafts magazine (Spring 2008), made with Noro sock yarn. I didn't have the materials on hand to create a doll exactly like hers, so I improvised. I used a peg doll form for the body (the "neck" worked perfectly as a waist, and the "head" became her bosom!) I wired the bead head onto the peg body using a pipe cleaner. I love how she turned out! I didn't want to fuss with fabric-covered-bead hands, so I opted to sew her cuffs together, monk-like...then had to figure out what to tuck into her embrace.
What else? Pussy willows, of course. They were that perfect finishing touch. We giggled at how she kind of looked like someone you might see on the streets of Killaloe, the beautiful village where I teach and once lived...and where most of my friends still live. Her floppy hat protect her from the Spring sun, and her eyes are closed in bliss.
PS: We crafty mamas know in our hearts that these little exchanges aren't really for our kids...they're for us. We know that when our children are well past the age of being interested in peg gnomes, felted flowers, and toadstools, we'll pop on our bifocals to continue creating for each other's delight. I can picture us in our 70s, giggling with delight over cups of tea, gently holding our latest handmade treasure, and adding them to a mantelpiece piled precariously with the offerings of all the years past. This will be our legacy.
Monday, May 9, 2011
Quick Posie Hat Tutorial
I wish I was one of those mothers who would make a sunhat by hand...then sew busily away until I had enough to sell on etsy. I'm not one of those. My girls needed sunhats, so I bought two of the same hat at our local hat and shoe store. They were cheap, pink, and cotton...that is to say, they were almost perfect.
I didn't like the little tied-in-a-knot bows adorning them, nor did I like the idea of the girls having hats that are EXACTLY the same. So, I personalised them, in about 10 minutes.
Trace a circle onto a piece of cotton of your choice, and cut out.
With needle and thread, do a running stitch (in, out, in, out) all around the outer edge of the circle.
Gently pull the thread to cinch the circle closed...
...and pull tight. Secure with a few stitches.
Remove the ugly bow, then choose a pretty button!
Sew the button to the centre of the flower, passing thread through the hat several times to secure the whole thing.
You might just get carried away and decide to add a whole garden! I am now thinking I may have to do an entire hat band of little posies. Try embellishing a jean jackets, barrettes, a brooch, or a sweater. They can also be stitched together to create a table runner, or if you're really ambitious, a whole quilt!
The bucket hat: an essential piece of summer clothing, personalised and created (almost) entirely by hand!
Labels:
crafts,
seasonal fun,
sewing,
tutorial
Sunday, May 8, 2011
A Mother's Day Tutorial
This Mother's Day, we gathered at the homestead for an al fresco brunch: quiche, sausage, bacon, strawberry-and-mixed-greens salad, fruit salad, and homemade cinnamon buns. And coffee, of course! The sun shone on our little celebration, mingling with the still-cool breeze.
We made a few simple orange-juice-toasts, to the mothers present: my sister, mother, friend, and me. We toasted those not present, and the mothers who have gone before (namely, my parents' mothers, as well as the mother of my brother-in-law). We also raised our glasses to the stepmothers who raised him, and my husband, through their teens. I felt a slight squeeze in my heart at the thought of my recently departed grandmother; this was our first Mother's Day without her, and I had to keep reminding myself this morning that she would not be making her teetering way up our front path.
I spent Saturday away (that's another blogpost), so my husband had the day to prepare something sweet for the mothers present. Knowing that I photograph every craft we do, he gamely grabbed the camera and took a snap of each step! So, thanks to him, I can share this sweet tutorial with you.
You'll need:
We made a few simple orange-juice-toasts, to the mothers present: my sister, mother, friend, and me. We toasted those not present, and the mothers who have gone before (namely, my parents' mothers, as well as the mother of my brother-in-law). We also raised our glasses to the stepmothers who raised him, and my husband, through their teens. I felt a slight squeeze in my heart at the thought of my recently departed grandmother; this was our first Mother's Day without her, and I had to keep reminding myself this morning that she would not be making her teetering way up our front path.
I spent Saturday away (that's another blogpost), so my husband had the day to prepare something sweet for the mothers present. Knowing that I photograph every craft we do, he gamely grabbed the camera and took a snap of each step! So, thanks to him, I can share this sweet tutorial with you.
You'll need:
- wool felt, various colours
- needle and thread
- scissors
- a button
- a pin or barrette
Cut a piece of felt in half lengthwise. Cut another larger piece the same way.
Fold the strip in half (lengthwise), and sew a running stitch along the open edge.
Draw chalklines about one inch apart along the folded edge, then snip!
Older children can do this on their own!
Pull that running stitch tight, creating a pretty posey!
Place the smaller rosette on top of the larger one, and either hot glue, or secure with a few stitches.
Choose a pretty button.
Add a circle of felt to the centre of the flower, with the button secured on top (either sew or glue these pieces on).
Glue another felt circle on the back of the flower, then either stitch on a barrette, or a pin.
Wear with pride, and big smile!
Knowing that my husband took the time to try a new craft with the kids, photograph it, AND present it to me as a handmade gift made my Mother's Day more than any box of chocolates ever could!
Wishing all of you mamas out there a restful, blessed day to bask in the love of your children.
Labels:
celebrations,
children,
crafts,
tutorial
Subscribe to:
Posts (Atom)