Pages

Showing posts with label hat tutorial. Show all posts

Thursday, July 15, 2010

100th Post Giveaway!

To celebrate my 100th blog post (which was actually a few days ago, but let's just pretend it's today!) I present to you my very first giveaway! I've decided to offer some options, as I am fond of so many of my creations.

This is giveaway to celebrate the mamas, sisters, daughters, grannies, nannies, and girls out there: the "gift" is a wonderful, unique knitted hat!

Because you are unique and have a superb sense of style, I offer two choices:

The Rosie Posie hat, made in an adult size...I can also make a smaller rose, in the same colour as the hat, omit the leaves, add a "posie" (a small grouping of roses), or any variation on the theme that you wish! I can also offer a variety of base colours.

Okay, this is a picture I borrowed from Ravelry, so it's a bit fuzzy; I've made several of these hats but have no photos to show the great detail of that moss-stitch band and oversized button! Not the best pic (and the model is nowhere NEAR as cute as the one at the top ~ haha!), but a fair representation of the "Robin's Egg Blue hat" that is being offered as an option in this giveaway. Again, the colour choice is yours.

This giveaway is open to everyone! If you are just stopping by but are not a Follower, please comment only once under this post. Followers have an advantage: you can enter a comment under this post every day until the contest closes. (*if you really want to win, it's easy to become a Follower: just click the button on the right that says "Follow"!) I encourage you to pass details of this giveaway on to others. Let the games begin!

The winner will be chosen randomly on Friday, July 23, and announced the same day! We'll exchange emails, to discuss the details: sizing, colour choices, and where to send it.

I will happily ship to anyone, anywhere in the world! Best of luck!


Monday, July 12, 2010

Home Sewing Part 2: Revamping Old Oven Mitts!

In last week's home sewing post, I showed you how to create a simple log-cabin table runner. You can make one even if you don't live in a log cabin, as this refers to the style of the quilt block...I'm sure it would perk up apartments, farmhouses, yurts, and igloos just as much as a log cabin!

When I finished that, I was feeling mighty chuffed...so of course I looked around to see what else I could sew. My eyes immediately fell upon my old, crusty, oft-used and rarely-washed oven mitts! I remembered my mother sewing new covers for her old ones, to match the kitchen decor...dusty blue, or reds and yellows...it seemed like my mom was always re-imagining her kitchen and I have fond memories of giving the old wainscotting a fresh coat of white oil paint in the summertimes of my teenage years.

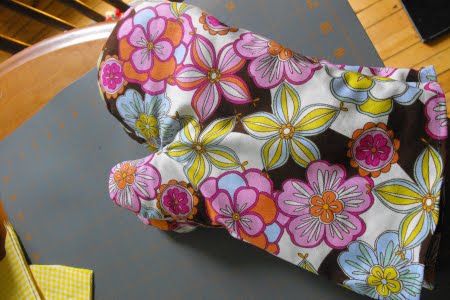
This is the second set I made, to match my runner...I couldn't help myself!

So, here's how it's done. If your old oven mitt is a padded object inside a fabric mitt, pull this out. OR you can just trace the whole thing (the pair above was the quilted-padding kind). Place the old fabric "outer" on a double layer of your chosen fabric (right sides together!) and trace it, giving it a generous allowance (an inch would be lots). Remember to leave some fabric at the bottom to allow for a hem.

Sew a 1/4" seam around the whole thing, then hem the bottom (just turn it up about a 1/4", then again, and sew around). Before you turn it right-side out, you'll need to make a few snips at curvy parts, like around the top, and around the thumb (be careful not to snip through your stitching!) This prevents the fabric from bunching and buckling when you have it right-side out.

Also make some snips in that "joint" between thumb and fingers:

Turn it right-side out, insert the old pad, and Bob's your uncle! I am in love with my new oven mitts...they're so fresh and clean and cheery. And they're gingham...how good can it get?

Can you fit in 15 minutes today to perk up your oven mitts?

Saturday, June 26, 2010

Rainy Saturday Tutorial


Things I love this morning:
.: seeing the little path through the wet grass, made by wee cat paws
.: the coffee-perk sound of rain hitting the summer kitchen's tin roof
.: my husband in his favourite faded jeans and an OLD leather belt
.: the smell of real coffee perking, my weekend treat
.: Margot still sleeping at 8:20 a.m.
.: a rainy Saturday of yard-sale road tours with the kids
.: Violet agreeing to model this new hat I've made!

This is a bonus post, as I usually take weekends off...but I'm officially on summer holidays now (wheee!) and I came up with this sweet hat pattern over the past few evenings. I thought that if you, like me, love a quick simple knit for a rainy weekend, you might appreciate a wee tutorial.

Rosie Posie Hat

Cascade 220 wool (or any worsted weight wool/yarn...cotton would be cute for a spring/summer cap!)
4.5 mm needles, 16" circular
Size: this hat fits Margot, who is 16 months and has a big head like her mother; it also fits Violet, who is 3 and has a more delicate bone structure! So it just depends on the child's head...email me if you need help with sizing for a smaller/larger child/adult!

For hat:
Cast on 80 stitches. Place marker to indicate beginning of row. Join in round and K1 row, P1 row; continue in this manner (garter stitch) until work measures 2 inches.

Change to stockinette stitch: Knit around and around until work measures 4 1/4"; place markers every 10 stitches. You should have 8 markers in all.

Now begin decreasing:
R1: Knit 8, K2 together. (basically, knit till there are 2 stitches left before the marker, then K these 2 together). Repeat around row.
R2 and all even rows from now on: Knit
R3: Knit 7, K2 together; repeat around row.
R5: Knit 6, K2 together
R7: Knit 5, K2 together

You see where this is going? You knit to two stitches before the marker, then knit these two together, slip the marker, and repeat around the row, then knit the rows in between. This will create a nice spiral/flower shape on top of your hat:

Keep going until you K2 together all the way around. On the next row, K2 together again all around (if you knit a row between these last two rows, you'll end up with a funny little "nipple" at the top of your hat!) You should have 4 stitches left; I use the word "should" loosely...you can be more flexible with hats so if you end up with 6, don't worry!

Break yarn off, leaving a 4" tail; thread through remaining stitches and sew in ends.

To make a rose:

Using another colour, cast on 10 stitches.
R1: K
R2: P
R3: Knit into front and back of each stitch, to end. (20 stitches)
R4: P
R5: Knit into front and back of each stitch, to end. (40 stitches)
R6: P
R7: Knit into front and back of each stitch, to end. (80 stitches)
R8: Bind off all stitches.

Shape into a spiral/rose form, and secure with a needle and yarn.

To make leaves: (make 2 or 3)

Using green, cast on 3 stitches.
R1: K
R2: K1, P1, K1
R3: K into front and back of first stitch, K 1, K into front and back of last stitch (5 stitches)
R4: K2, P1, K2
R5: K 1, Kfb, K 1, Kfb, K1 (7 stitches)
R6: K3, P1, K3
R7: K1, K2tog, K1, K2tog, K1 (5 stitches)
R8: K2, P1, K2
R9: K2tog, P1, K2tog (3 stitches)
R10: K
R11: K1, P1, K1
R 12: K2tog, K1
R13: P2tog

Break off yarn, thread through rem. stitch, and sew in end.

Now you can sew these leaves onto the hat:


Place the flower between the leaves, and sew on securely with yarn.


Ta da! Present at your next baby shower, birthday party, or just on any old day for a chorus of "Did you MAKE that??" Few feelings equal the gratification of gifting a handmade item to a loved one.

Please email me with any questions; I've been knitting since I was a child and take some things for granted! If you're a beginner and are totally scared away by the circular needles, take heart! Like driving a stick shift, they're only scary until you get used to them.

Now shut down your computer, and get knitting! I'd love to see photos of your finished product; please send a link in your comment to share your version of the Rosie Posie hat. Have a lovely, knitty, rainy weekend.